Nachricht für neue Nutzer.
Nachricht für engagierte Nutzer.
Arduino/Lauflicht mit Schalter und Potentiometer
Aus ZUM-Unterrichten
< Arduino
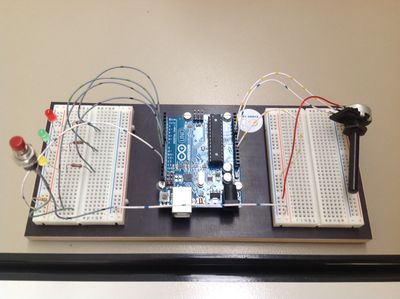
Das Arduino-Board wurde zusammen mit zwei Steckplatinen auf einer Holzplatte befestigt, um die Handhabbarkeit für den Unterricht in der Schule zu verbessern. Für die Befestigung des Arduino-Boards auf der Platte gibt es hier einen Bohrplan.
Die Steuerung schaltet 3 LEDs, die als Lauflichter funktionieren. Der Taster dient dazu, das Lauflicht anzuschalten. Das Lauflicht bleibt solange an, wie der Taster gedrückt bleibt. Die Zeitdauer, die jede LED an ist, wird über ein am PIN A0 angeschlossenes Potentiometer eingestellt. Der ausgelesene Wert wird in der Variablen "potiVal" gespeichert.
Sourcecode für Arduino-Sketch mit ausführlicher Kommentierung (englischsprachig)
/*
  Light chaser with pushbutton and variable speed
  Turns on and off LED1, then turns on and off LED2 and now turns on and off LED3.
  After this the procedure starts again.
  The loop routine runs only when the pushbutton switch is pressed.
  The chasing frequency can be set by the potentiometer.
   */

// Pin numbers are allocated to the variables led1, led2 and led3
// the digital input (pushbutton) and the analog input (potentiometer) are selected
// the variables for the inputs are chosen and set to 0 at the beginning of the sketch:
const int led1 = 11; //  11 (for LED Pin 11) is allocated to the variable led1
const int led2 = 12; //  12 (for LED Pin 12) is allocated to the variable led1
const int led3 = 13; //  13 (for LED Pin 13) is allocated to the variable led1
const int button = 7; // 7 (for button Pin 7) is allocated to the variable button
const int potiPin = A0; // A0 (for potentiometer Input Pin A0) is allocated to the
                          //variable potiPin

int val = 0;   // the variable to store the state of the input pin 7 (button)
                //is defined (val) and set to 0 (LOW) at the beginning of the sketch.
int potiVal = 0;  // the variable to store the value coming from analog input pin 7
                  //(potentiometer) is defined (potiVal) and is set to 0 at the
                 // beginning of the sketch

// the setup routine runs once when you press reset:

void setup() {
// initializes the digital pins 11, 12 and 13 as outputs.
pinMode(led1, OUTPUT); //led1 or pin 11 is an output
pinMode(led2, OUTPUT); //led2 or pin 12 is an output
pinMode(led3, OUTPUT); //led3 or pin 13 is an output
}

// the loop routine runs as long as the pushbutton is pressed
void loop() {
 {
 val = digitalRead(button);//read input value and store it
//check whether the input is HIGH (button)pressed
  if (val == HIGH) {

  potiVal = analogRead(potiPin); // read the value from the sensor

  digitalWrite(led1, HIGH); // turn the LED1 on (HIGH is the voltage level)
  delay(potiVal);              // wait for the time set by the Potentiometer
  digitalWrite(led1, LOW);  // switch LED1 off by setting the voltage to LOW

  digitalWrite(led2, HIGH); // turn the LED2 on by setting the voltage to HIGH
 delay(potiVal);              // wait for the time set by the Potentiometer
 digitalWrite(led2, LOW);  //switch LED2 off by setting the voltage to LOW

  digitalWrite(led3, HIGH); // turn the LED3 on by setting the voltage to HIGH
  delay(potiVal);              // wait for the time set by the Potentiometer
  digitalWrite(led3, LOW);  // switch LED3 off by setting the voltage to LOW
  }
 else {
 digitalWrite(led1, LOW);  // switch LED1 off by setting the voltage to LOW
 digitalWrite(led2, LOW);  //switch LED2 off by setting the voltage to LOW
 digitalWrite(led3, LOW);  // switch LED3 off by setting the voltage to LOW
   }
}}


